
This easy vegan vanilla cake is the perfect dessert for birthday parties, graduations, weddings or just because occasions. Nothing says happy like a soft and sweet vanilla cake and creamy frosting!
This white cake has it all–it’s fluffy, has the most tender and moist crumb, and a deep vanilla flavor. Dress it up with some fancy buttercream work or keep it simple with a drizzle of chocolate ganache, this cake is sure to delight!
It’s admittedly a lot harder to make a good vanilla cake vegan than it is to make a chocolate or other strongly flavored cake (carrot, apple, red velvet–you get the idea). Vanilla is a delicate flavor that is easily overpowered if you use the wrong ingredients or even the wrong proportions of ingredients. White cakes also have the propensity to come out dry, for whatever reason.
This recipe is everything you want from a vanilla cake and more! Even better that it just happens to be vegan. Making vegan cakes is a unique process from their egg and dairy counterparts, but the results are equally tasty!
How to make a vegan cake:
Traditional baking uses butter to whip air into a batter and eggs for structure, stability, and leavening. We switch out butter for a neutral flavored oil (like canola or safflower), and depend on leavening from baking powder and baking soda.

To start we clabber the plant milk with apple cider vinegar to make a quick buttermilk. While most non-dairy milk options will work, soy milk, almond/cashew milk, and oat milk will have the best results (and please don’t use rice milk which is too watery).
Adding a little vinegar to the recipe does a few things: it reacts with the baking soda for leavening, it tenderizes the gluten formation for a softer cake, and it slows down browning as it lowers the pH of the cake.
Next, we mix together the dry ingredients. I’m a huge proponent of weighing your ingredients as there is very little room for error if you weigh. Kitchen scales are inexpensive and yet one of the best investments you can make if you love to bake!
If you’re measuring by volume, I ask that you measure your flour in this specific way: First whisk the flour in its container to fluff and undo any settling of the flour. Then scoop with your measuring cup so it’s overflowing.
Remove the excess by scraping across the top with the back of a knife. This is how I measure, so for best results you should do the same! Also keep in mind I use US standard measuring cups, which are a little different than UK and Australian.

With the flour we add in the granulated sugar (use organic or a certified vegan one if you’re concerned about bone char in the mix), baking powder, baking soda, and salt. Whisk everything together so it’s fluffy and well combined.
Then to the buttermilk mixture, mix in oil and vanilla extract until smooth. Use a good quality pure vanilla extract, this recipe calls for a lot of vanilla and the flavor really shines through at the end.
We add the wet ingredients to the dry, and mix with a whisk. While with egg-based cakes you have to be very careful to not over whisk, this is less of an issue with vegan cakes.
In fact, a little gluten development through whisking helps build the structure and stability of the cake. Don’t over do it, just mix the cake batter just until it’s nice and smooth.
Baking the cakes:
Do not add the wet ingredients to the dry until 1) your oven is preheated and 2) your baking pan(s) are prepared. Once the wet ingredients are added the baking soda will immediately begin to react, so waiting to bake your cake will result in a flatter and less desirable result.
The cakes are baked at 350 ºF. This relatively low temperature keeps the cake from browning too quickly on the outside, and helps lessen the doming of the cake.
Watch for visual cues that you cakes are done baking. When done, the edges of the cake will be golden and have started to pull away from the sides of the pan. A cake tester will also pull out clean, or with one or two crumbs. If there is any stickiness then continue baking it until done.
If you open the oven door too early in the baking process, this can cause the center of the cake to collapse. An oven light helps you keep an eye on the cake to watch for the visual cues before opening to test.
To prep your baking pans, I use a method I learned from the vegan dessert guru, Fran Costigan. I spray a coating of oil inside the pan, then add a piece of parchment to cover the bottom. I love buying the precut parchment circles, but you can also cut them out yourself. This method allows for easy release from the pan, then just remove the parchment paper from the bottom and you’re good to go!

Decorating the cakes:
This post is more about baking the cake than decorating. But just a few quick notes to set yourself up for success.
Always chill the cakes before frosting. Cold cakes = less crumbs = a better finish on the frosting. This is also true if you plan on cutting off the top of your cake to level, or to cut it in half to create more layers.
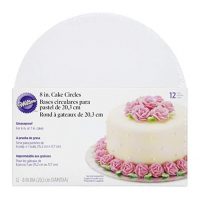
Use cake boards when wrapping up your cakes to refrigerate as they will keep the bottom of the cake nice and flat. While you could cut up clean cardboard or foam core board to size, you can also just buy pre-cut cake cardboard.
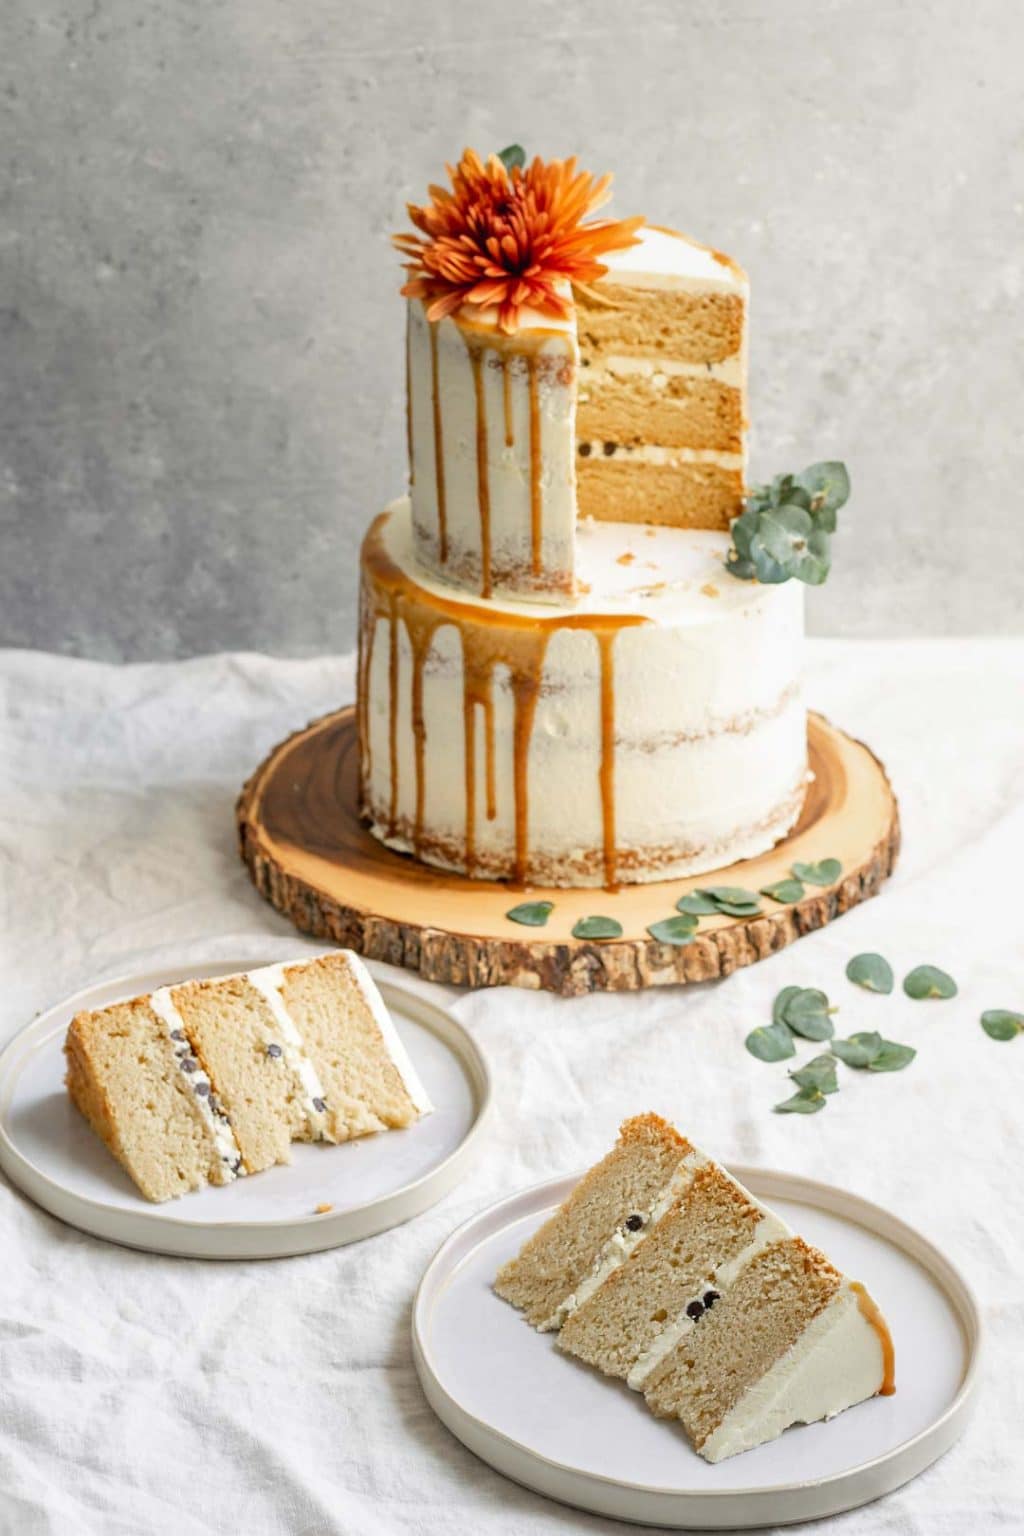
I used my Vegan Aquafaba Strawberry Italian Meringue Buttercream on this cake, minus the strawberry part. Feel free to use that recipe (and check out that post for a step by step photo tutorial of frosting a cake). You can make the buttercream in advance–it freezes well–and then rewhip (defrost in the fridge if frozen) to fluff it back up for easy spreading.
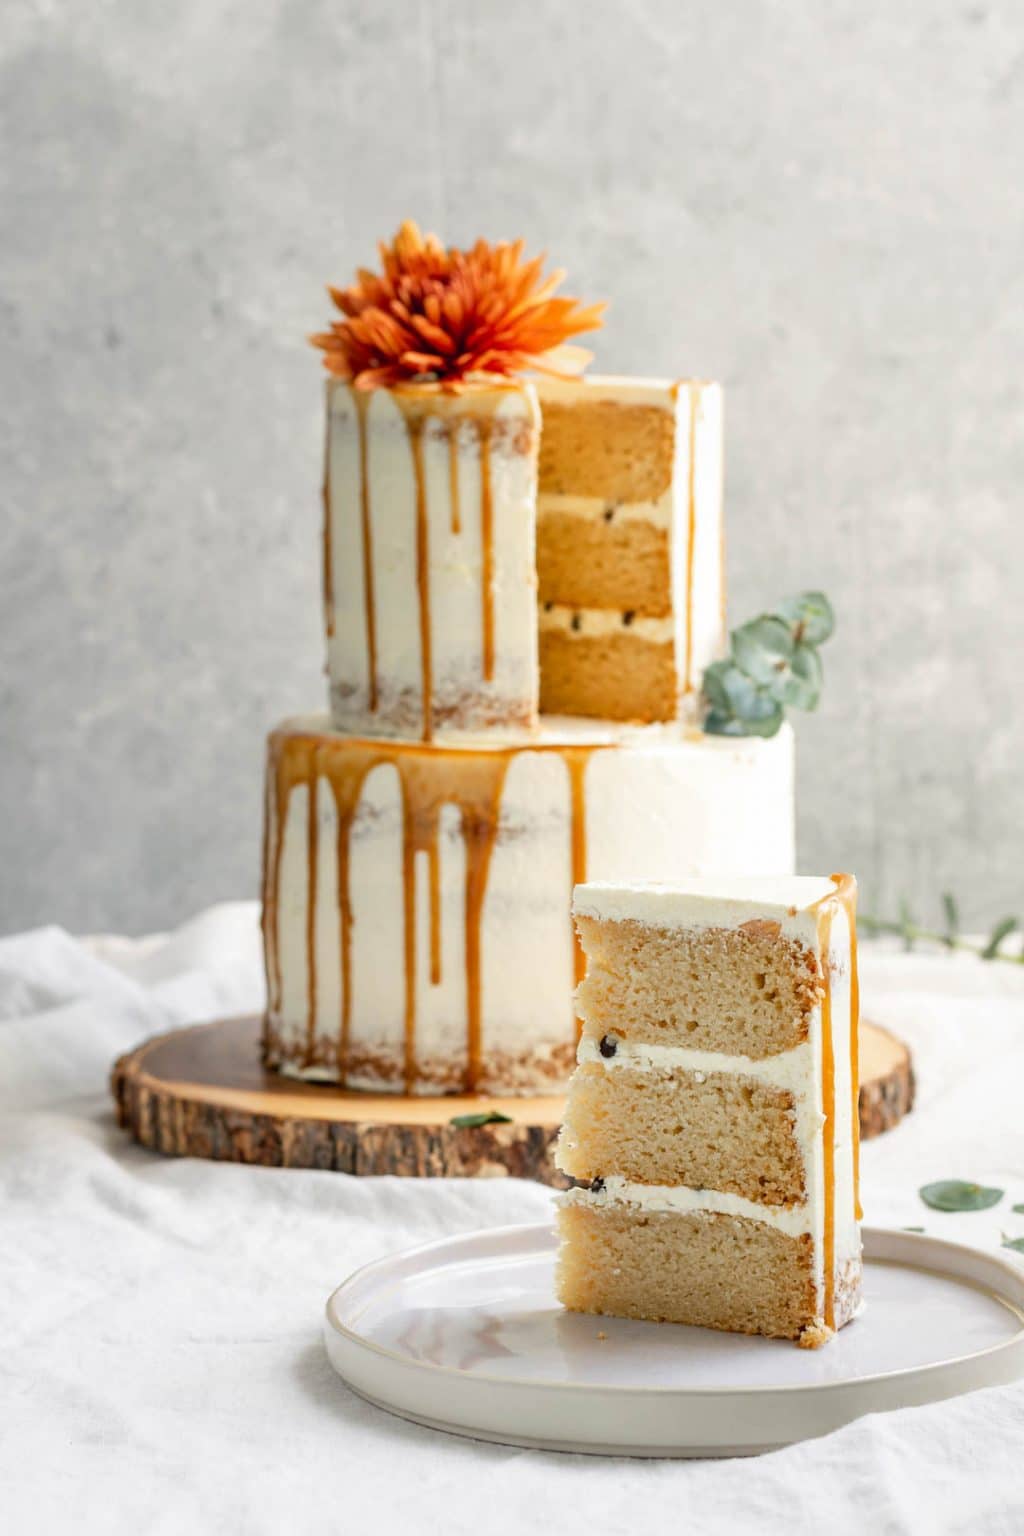
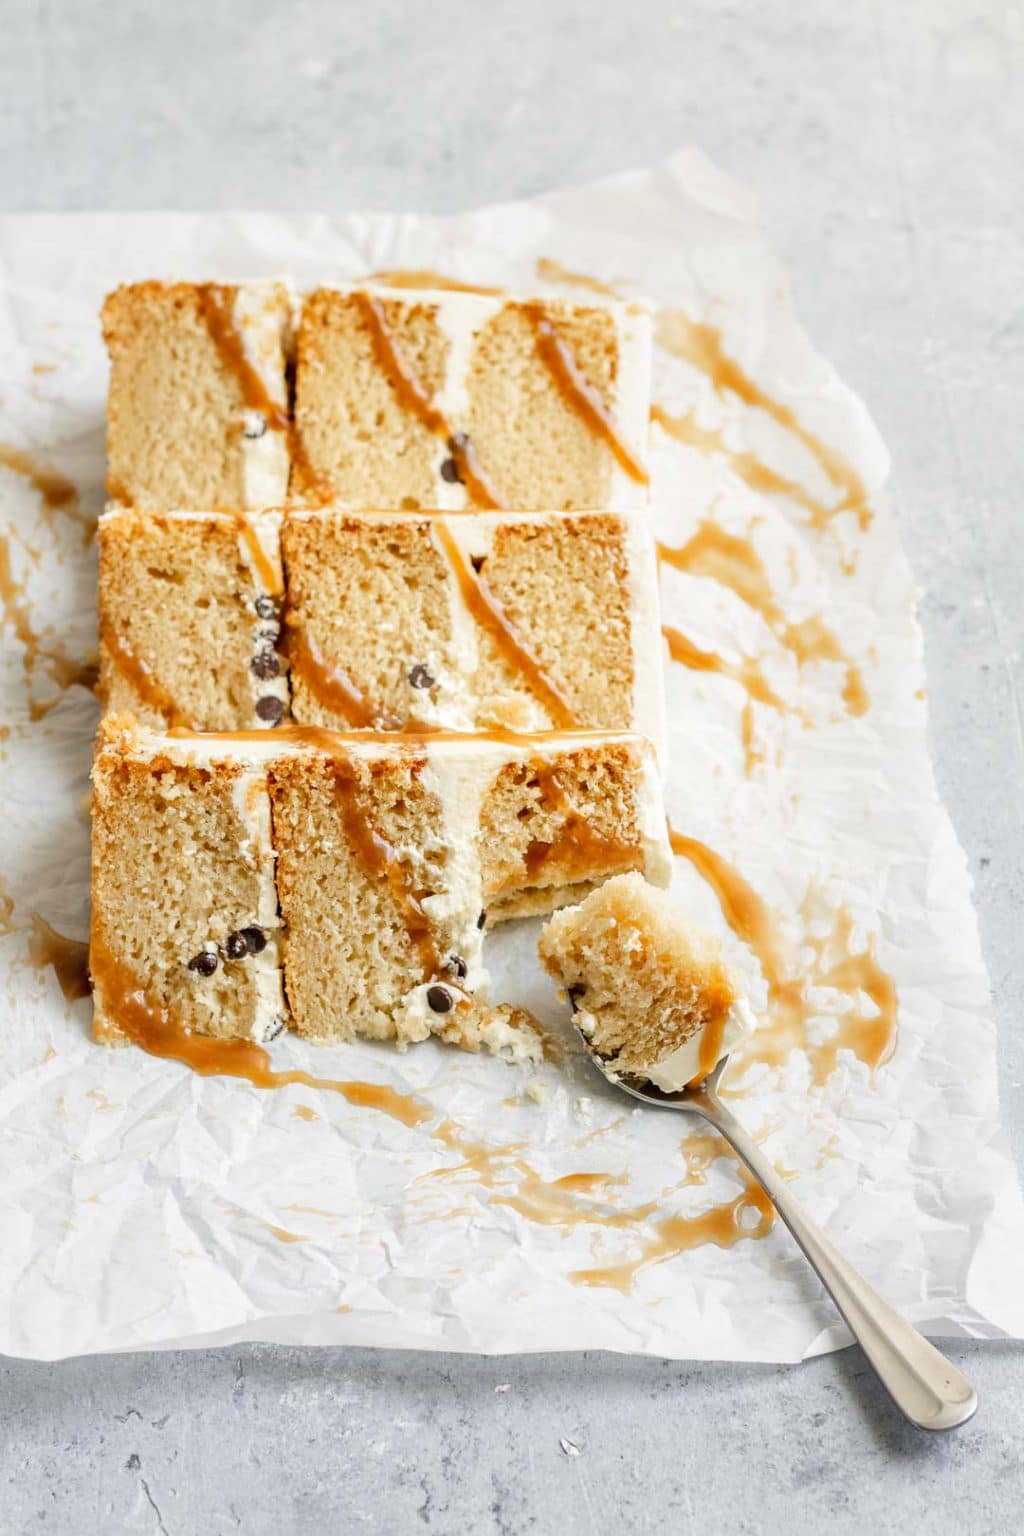
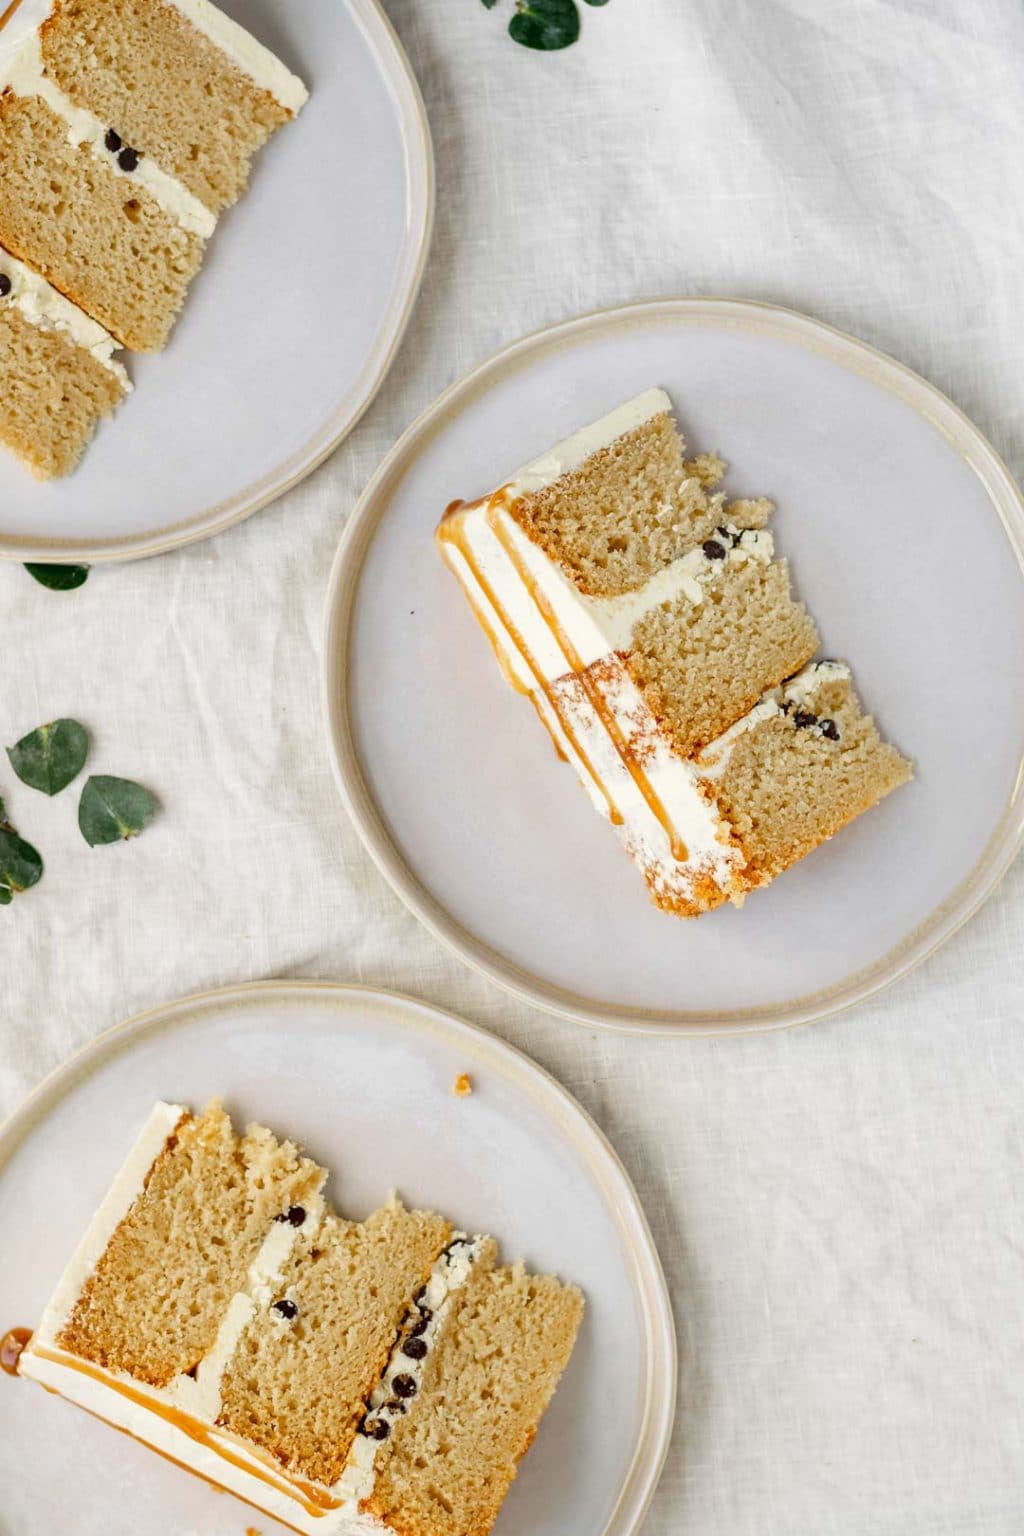
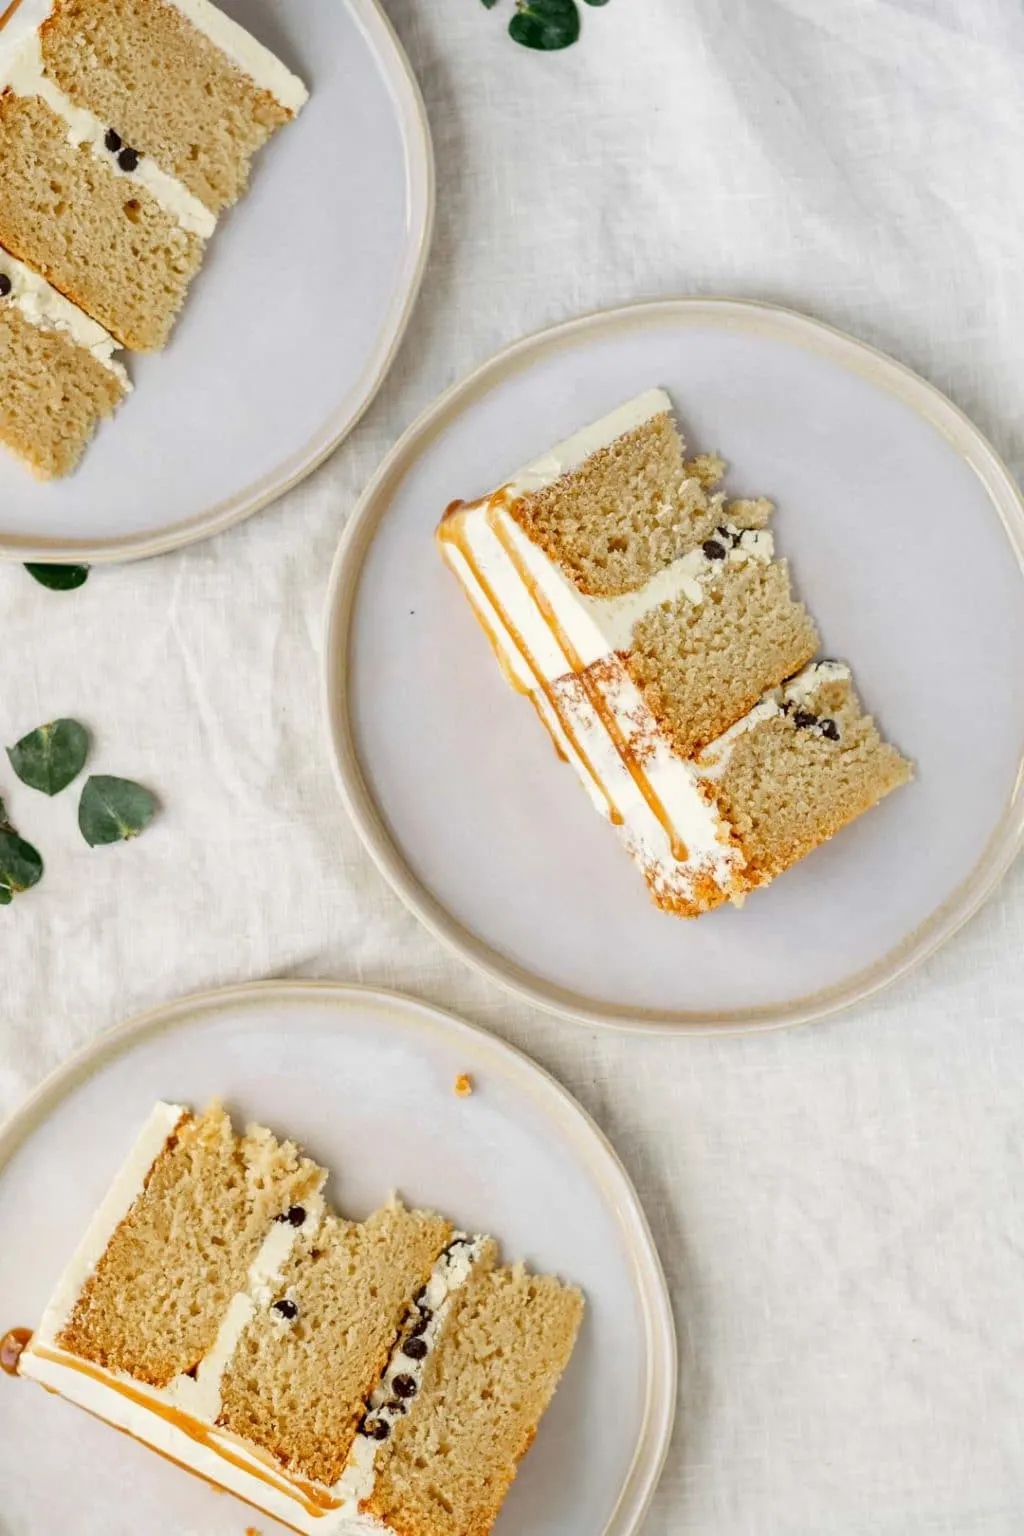
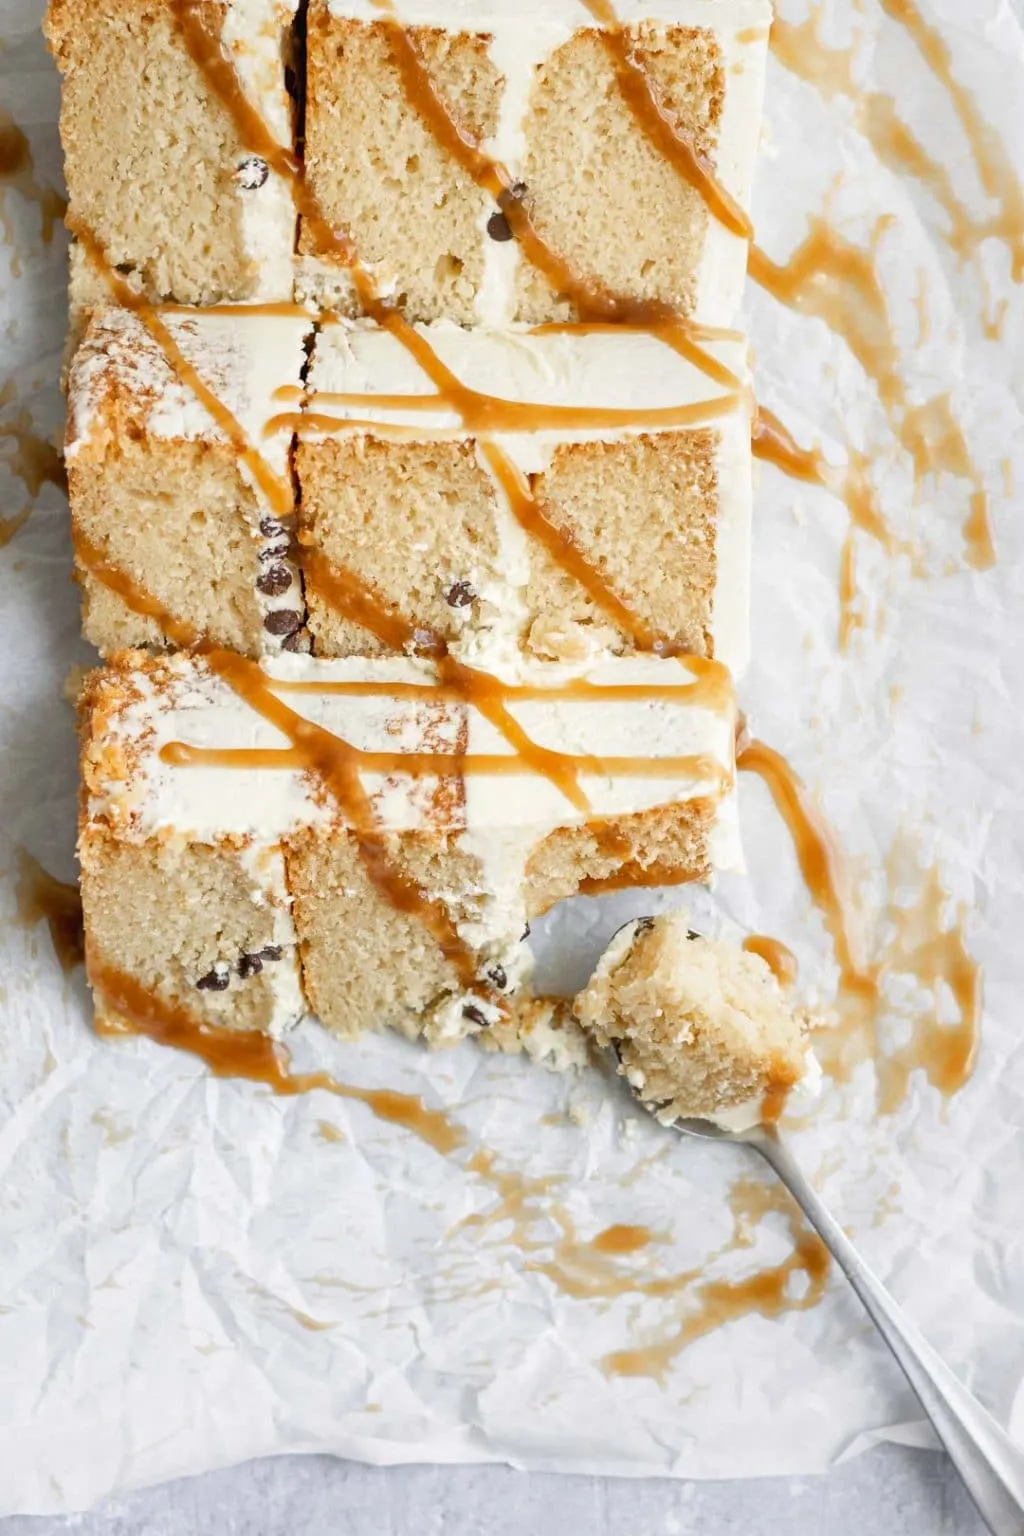
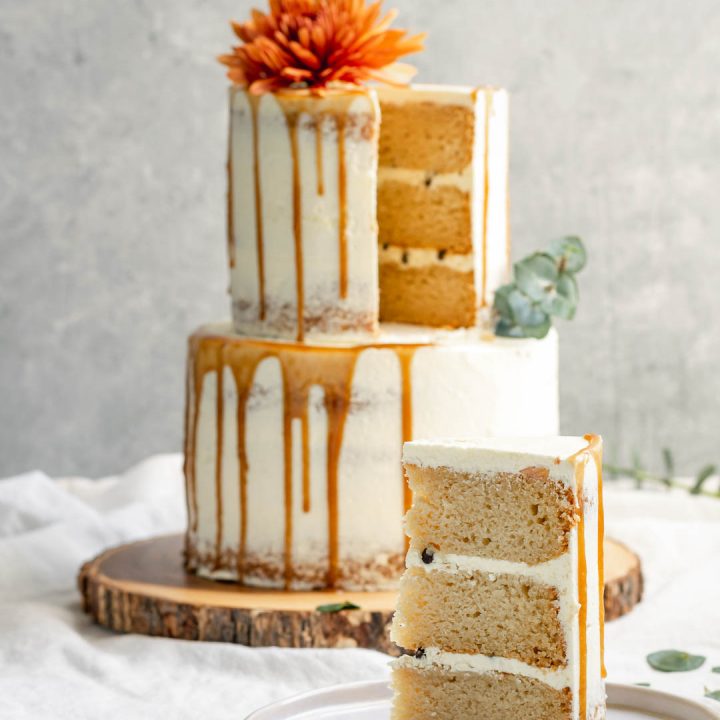
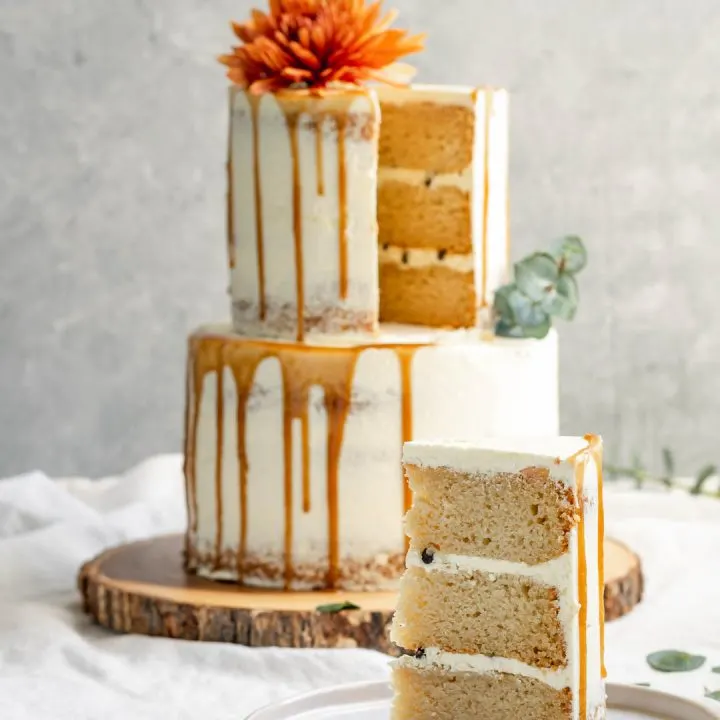
I sprinkled mini-chocolate chips between the layers after adding the buttercream. These led to a nice textural contrast to the cake, and I love me some chocolate! If you’re unsure where to find them, Enjoy Life Foods makes vegan chocolate chips in full size and minis.

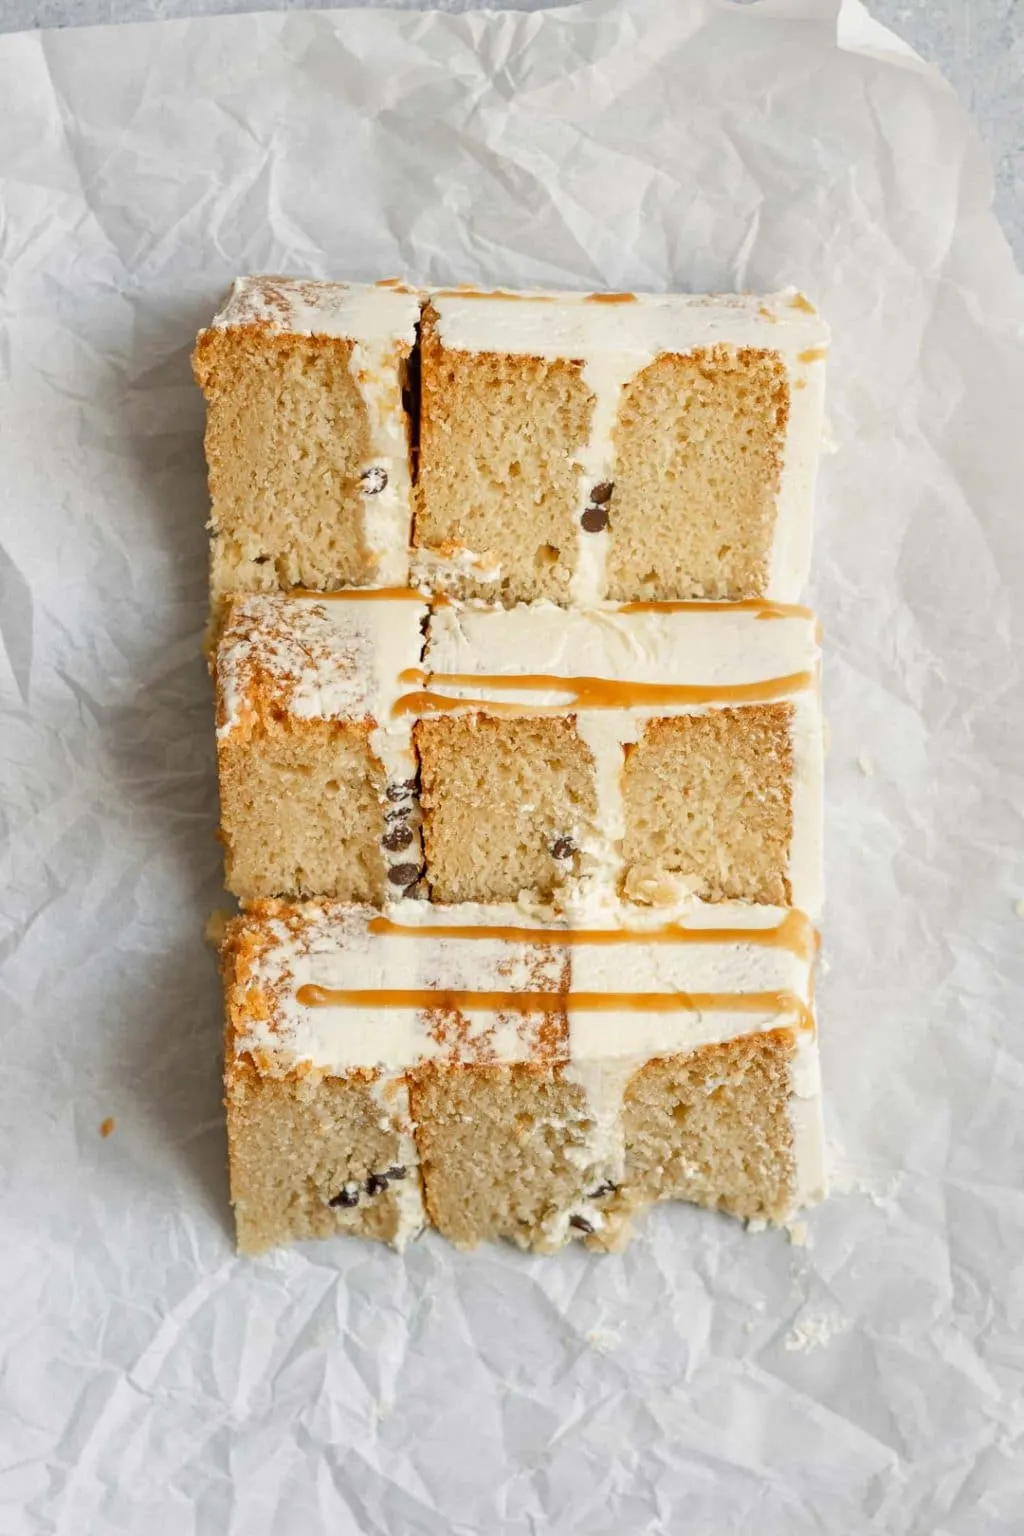
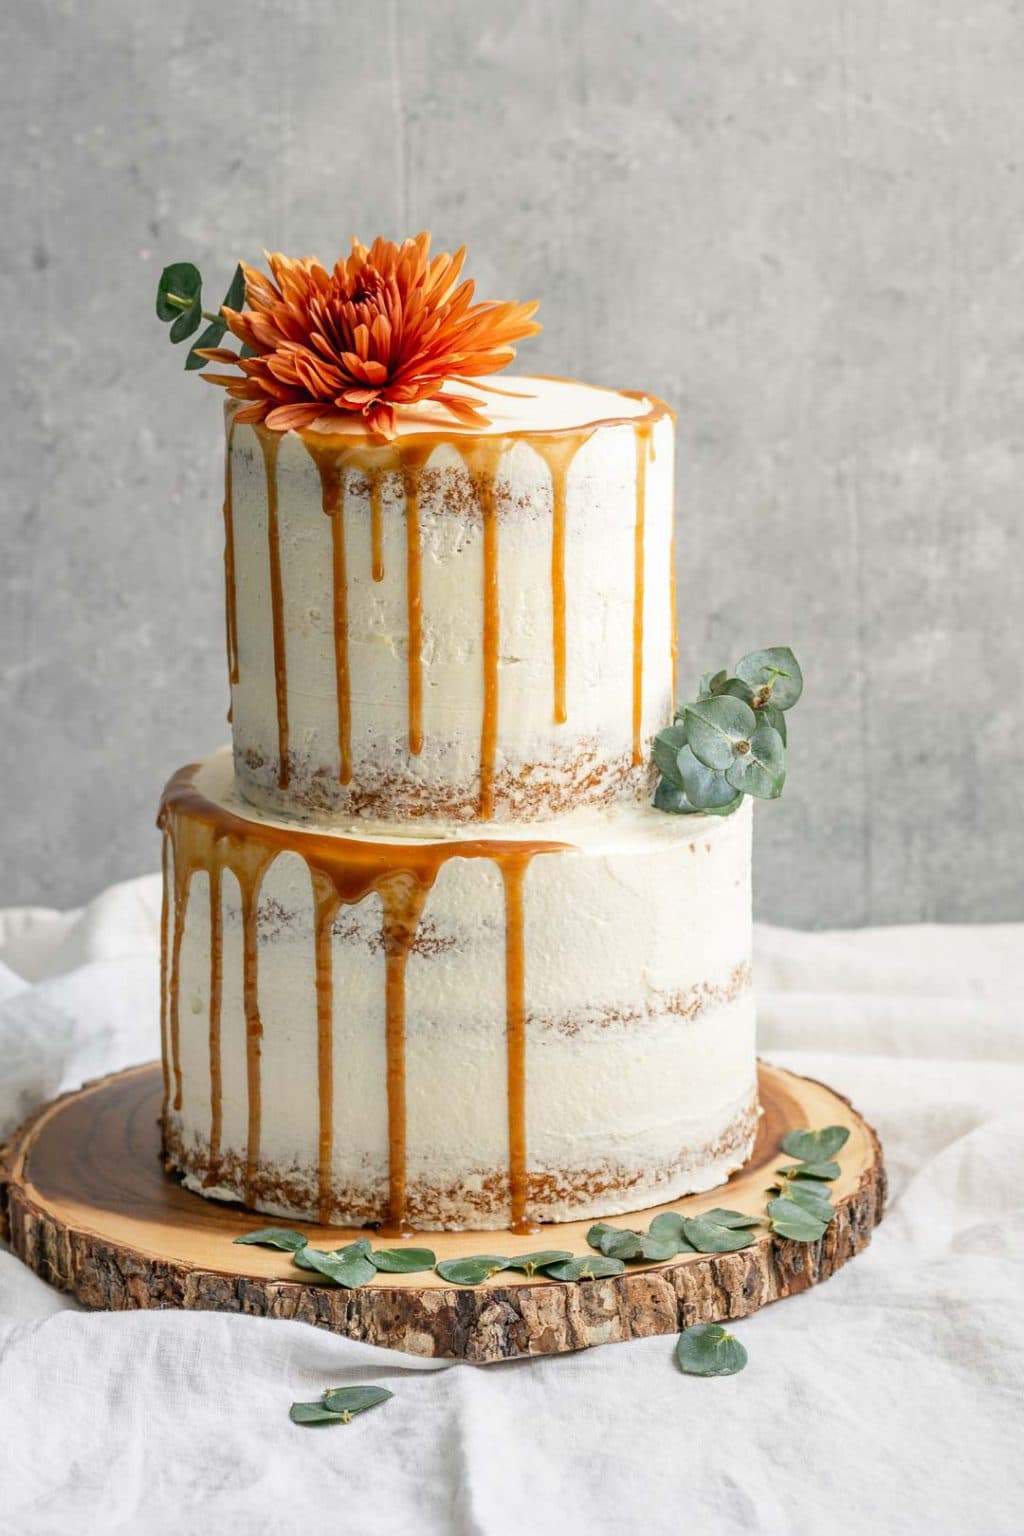
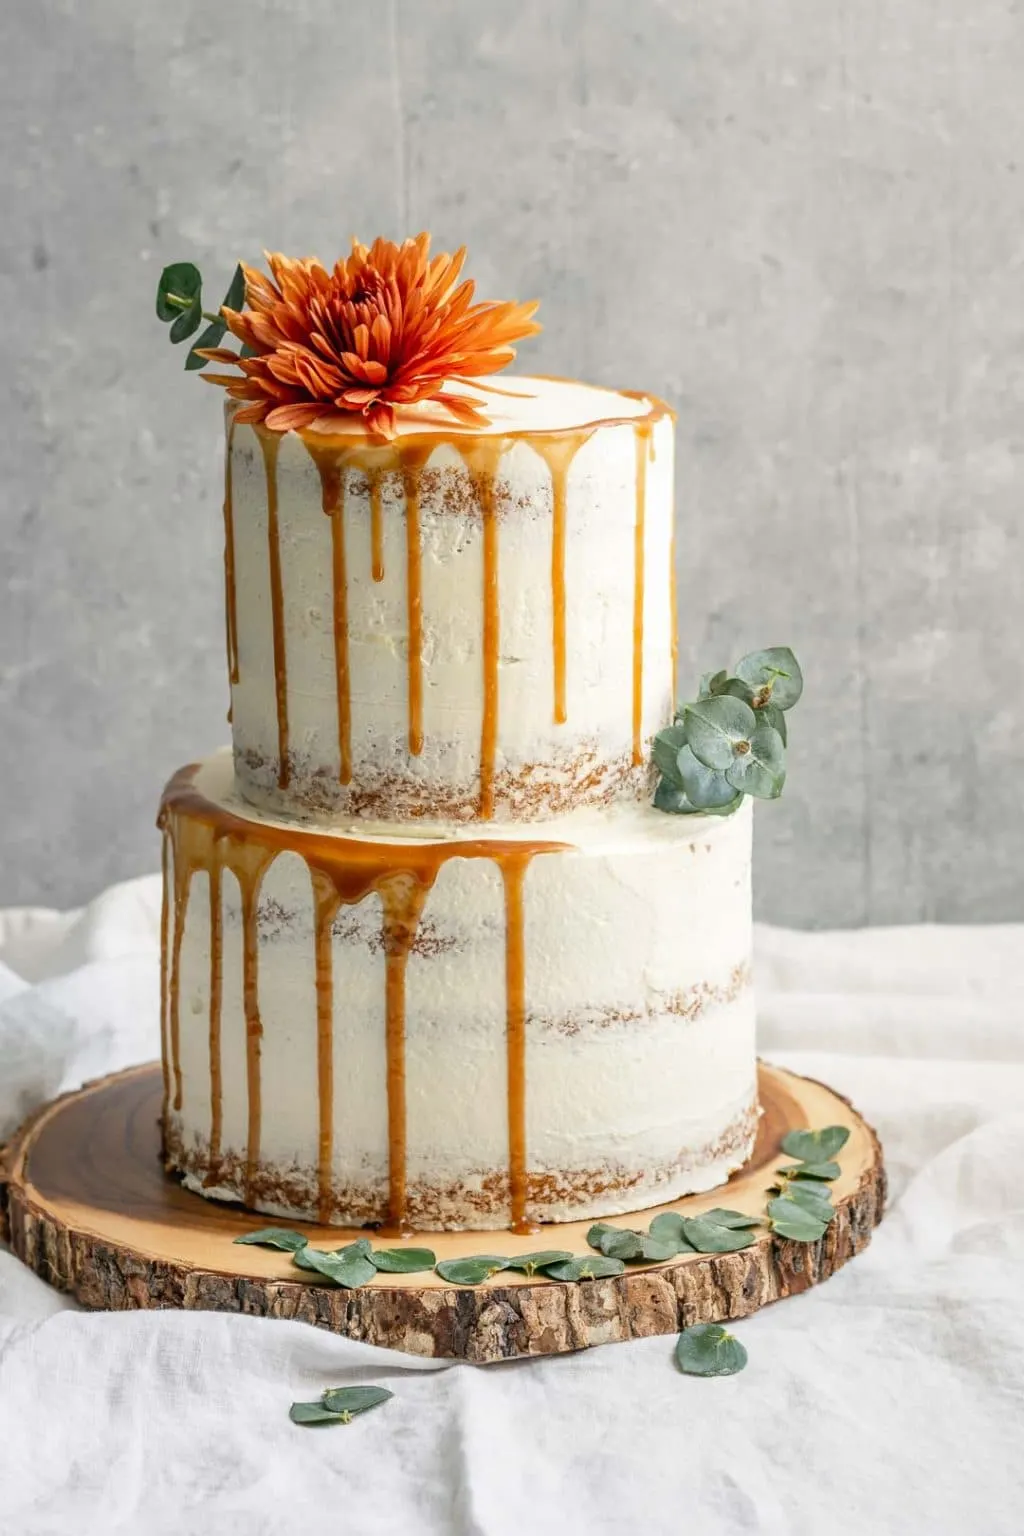
Lastly I drizzled some Vegan Salted Caramel Sauce over the cake, and used the recipe from my friend Cupful of Kale. The salted caramel is made from brown sugar and is sooo delicious, we found ourselves drizzling it over each slice of cake to serve!
If you’re going to use fresh flowers to decorate make sure to do so in a food safe manner! Here’s one nice article on How to Decorate a Cake with Flowers by Olive and Artisan. Just make sure you do your research on how to safely use flowers if you are going to do so!
I made this cake as a tiered cake because it was a test for the cake I am making for my friends’ wedding. It held up beautifully sitting out on the counter overnight, and the ultra moist and tender crumb makes for the most delectable cake! There are plenty of tutorials online if you wish to do the same. Or if you ask nicely, maybe I’ll make one too 🙂 !

If you make this cake, please let me know! Give the recipe a rating and leave a review below! Also don’t forget to share your creations with me on Instagram, tag @thecuriouschickpea and #thecuriouschickpea, I absolutely love seeing your photos!
LIKE WHAT YOU SEE? FOLLOW ALONG ON INSTAGRAM, FACEBOOK, AND PINTEREST!
Note:
- Vegan cakes have a tendency to be stickier than their non-vegan counterparts, so keeping the cake cold before decorating is extra important. The cakes should be refrigerated until thoroughly chilled before leveling or torting (cutting the cake into 2 or more layers) and before frosting.
- The cake shown here has a bottom tier of three 8″ cakes and a top tier of three 6″ cakes. The batter for one 8-inch cake is divided in half to make two 6-inch cakes. So to make this exact set up use the ingredients to make two 8-inch cakes plus one 8-inch cake. Then make another one of the one 8-inch cakes to divide into two 6-inch cake pans. For a third cake, the 8-inch cake ingredients in half.
Easy Vegan Vanilla Cake
This vanilla cake has a soft, tender, moist crumb and just happens to be vegan. It's easy to make and the perfect cake for birthdays and celebrations!
Ingredients
One 8-inch cake or Two 6-inch cakes
- 2 tsp (10g) apple cider vinegar
- 1 cup + 2 tbsp (270g) plant milk
- 1 1/2 cups + 1 tbsp (210g) all purpose flour*
- 3/4 cups + 1 tbsp (170g) granulated sugar
- 1 1/2 tsp (6g) baking powder
- 1/2 tsp (2g) baking soda
- 3/4 tsp (5g) salt
- 1/4 cup + 2 tbsp (82g) oil
- 1 1/2 tbsp (16g) vanilla extract
Two 8-inch cakes
- 1 1/2 tbsp (20g) apple cider vinegar
- 2 1/4 cups (540g) plant milk
- 3 cups + 2 tbsp (420) all purpose flour*
- 1 1/2 cups + 2 tbsp (340g) granulated sugar
- 1 tbsp (12g) baking powder
- 1 tsp (5g) baking soda
- 1 1/2 tsp (10g) salt
- 3/4 cup (164g) oil
- 3 tbsp (32g) vanilla extract
Instructions
- Preheat the oven to 350 ºF. Prepare the baking pan(s) by spraying with oil then placing a parchment paper circle to cover the bottom of the pan.
- In a mixing bowl add the plant milk and vinegar and set aside to clabber for 5-10 minutes.
- In a second mixing bowl whisk together the flour, sugar, baking powder, baking soda, and salt until fluffy.
- Add the oil and vanilla extract into the clabbered milk and mix to combine. Add to the dry ingredients and whisk until the batter is smooth.
- Pour the batter into the prepared pan (or divide in half if baking 2 cakes). Bake the 8" cakes for 36-38 minutes, bake the 6" cakes for 31-33 minutes. The cakes are done when the edges are golden and have pulled away from the sides of the pan and a test comes out clean or with one or two crumbs.
- Remove from oven and let cool for 10 minutes. Then working gently, turn over the pan with a wire cooling rack to catch the cake. Remove the pan, then peel off the parchment paper. Turn the cake back right side up and leave to cool fully on a cooling rack.
- Place the cooled cakes on a cake board and wrap tightly in plastic wrap. Place in the fridge or in freezer-safe ziplock bags in the freezer until ready to decorate.
Notes
*To properly measure the flour: whisk to undo settling, scoop, then level. Measuring any other way could result in too much or too little flour. If possible it is best to use a kitchen scale.
This cake was decorated with my vegan aquafaba italian meringue buttercream (minus the strawberry sauce), with mini chocolate chips between the layers, and a vegan salted caramel sauce drip by Cupful of Kale.
Recommended Products
As an Amazon Associate and member of other affiliate programs, I earn from qualifying purchases.


Shamima
Thursday 12th of June 2025
Hi, thank you so much for the recipe. I can't wait to try it and from the reviews below I'm sure I'm in for a treat. My 3 year old daughter has so many allergies so finding her a cake that is good for it so hard. I wanted to know how many cakes you had to bake to get the cake in the picture? It's two tiers and I wanted to make it for my daughter's birthday. Can you please let me know how many cakes and what inches?
Olivia
Thursday 24th of April 2025
How many people does this feed? I need to make a cake for 50 people, what do you recommend I do? Or how many batches to make? It’s just one tier any size. I’d be grateful for any help!
Hannah
Wednesday 12th of March 2025
Is it possible to make this into a matcha flavored cake? If so what/ how much should I substitute?
Sarah
Saturday 8th of February 2025
Can I just say that this recipe SAVED me!!!! I needed an egg free recipe for an order and my usual one was just not working. After 3 failed attempts I found this recipe, rushed to the shops to get all the items and then followed the instructions. The cakes came out beautifully first time and the sponges were light and fluffy. Perfect to stack too. This will be my new go to recipe from now on. Thank you!!!!!
Olivia
Wednesday 11th of September 2024
Hi Eva! Would this cake translate well as a sheet pan cake? (I'd increase ingredient amounts as appropriate to the dimensions of the pan of course.)